Get started with Spring Boot, MongoDB and Docker Compose
Hi, my name is Saeed Farahi Mohassel and I’m going to teach you how to:
- Write a simple REST API app in Java Spring Boot framework
- Enable live-reload (or hot-reload or auto-restart or whatever you want to name it!) to help us code and have the application rebuild automatically
- Use MongoDB for repositories
- Use docker to containerise application services (why I said application services and not application? well you’ll find out when I am configuring docker-compose) with Dockerfile and docker-compose
This article is good for those like me who want to enter the Java Back End realm from somewhere else (.NET Core & NodeJs in my case). I will try to be through and explain every bit of what’s going on. Also, the source code for this article is here.

What is Spring Boot?
Spring Boot is an open source Java-based framework used to create a web applications and/or micro services. If you’ve never heard of it, or you want to read what the creators are saying, I recommend that you take a look at their website and come back.
According to go.java, Netflix uses Spring Boot heavily for their services. This surely makes things more interesting!
What is MongoDB and why have I chosen this?
MongoDB is the most famous NoSQL DBMS (Database Management System) out there! For comprehending this article, it doesn’t matter if you know MongoDB/NoSQL or not, although I strongly suggest that if you are not familiar with this family of DBMSs don’t waste the time!
REST API — > Create the project
Spring website gives us good starting point. Open this, and follow:
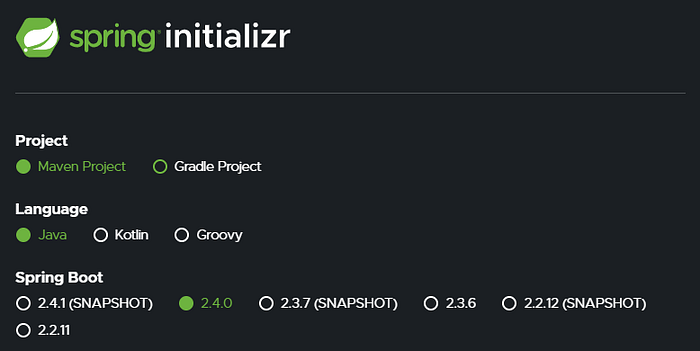
First I’ve chosen Maven for my project structure type. Then obviously selected Java and finally as I’m not a fan of SNAPSHOT versions, I’ve selected 2.4.0 version. Scrolling down:
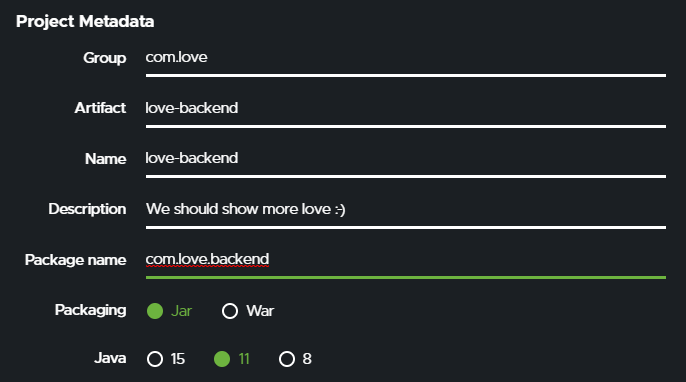
I think most of the fields are self-explanatory. As for the Java Version (last field on the image above), I have to say that I try to play safe! Java 11 has extended support until September 2026 (way after the COVID is gone-I wish) and until Java 17, it is considered the last LTS (Long-Time Support) version of Java available.
At the bottom of the page click on “Generate” button and you’ll download the boilerplate, how convenient! Extract that archive somewhere and you should see this folder structure:
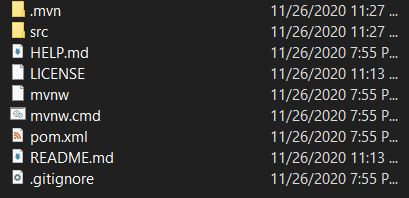
Codes are in src folder. Under main folder we have our code and under test folder we may write tests. In this article I am not going to dig into testing (maybe another time) and just focus on files under the main folder to write a simple REST API. And I won’t respect CLEAN folder structuring as we are in a hurry! From now on, every java file that I address, is under: src\main\java\com\love\backend\
For the coding part, I wanted to use IntelliJ IDEA for this tutorial, but as I love Microsoft and its products, I’m going to use VSCode. Just install Java Extension Pack or any other extensions to start coding Java.
Run the app:.\mvnw.cmd spring-boot:run
But it just wrote a “build successful” message and quit! Its because we have not added appropriate dependencies.
REST API → Add Project Dependencies and Configure them
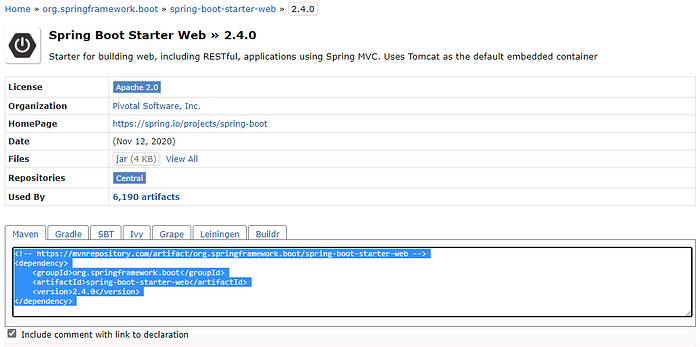
So far we’ve just added the basic dependencies of Spring Boot: Core and Test. In order to be able to code for the web we need the spring-boot-starter-web dependency. So, we go to the Maven website and look spring-boot-starter-web package: link, choose our version which right now is 2.4.0 and then click on it:
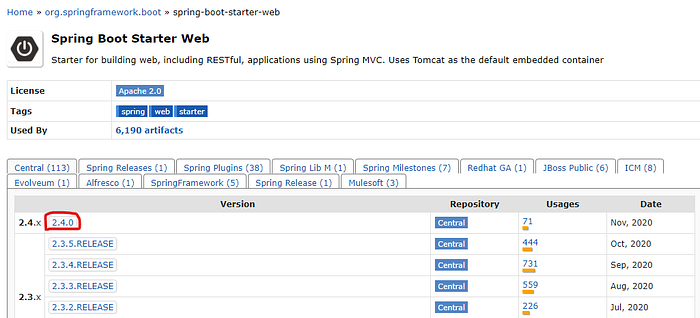
In the new page, click inside the text area, to copy the related XML which we need to copy into our pom.xml:
Now go to VSCode and open the pom.xml, then paste the XML inside the <dependencies> tag:
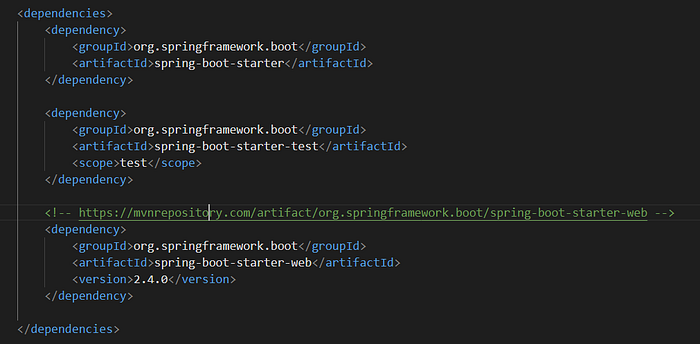
Now run the app. As a reminder you need to execute the following command to run the app:
.\mvnw.cmd spring-boot:runNow you see that the console won’t stop processing our code! Open localhost8080 and you’ll this error and it’s because we have no API!

REST API → Let’s be faster! Write an API
Create these two files somewhere you like: (I am not going to talk about code structure and/or design patterns)
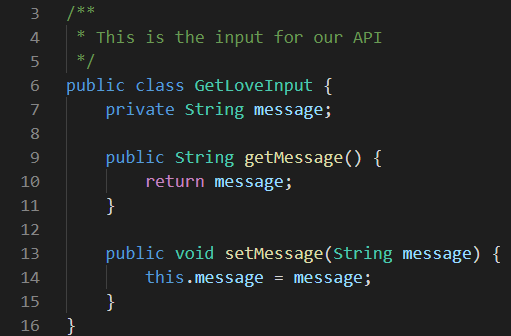
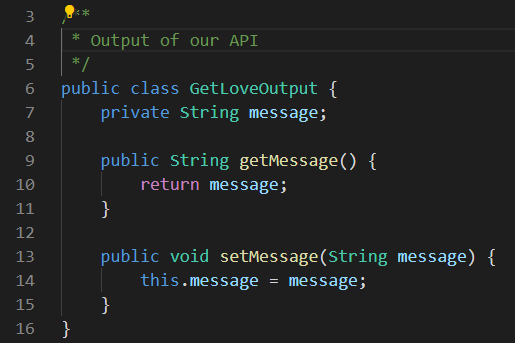
These are input and output of our API. Now create these two for the role of our services:
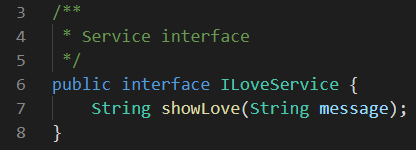
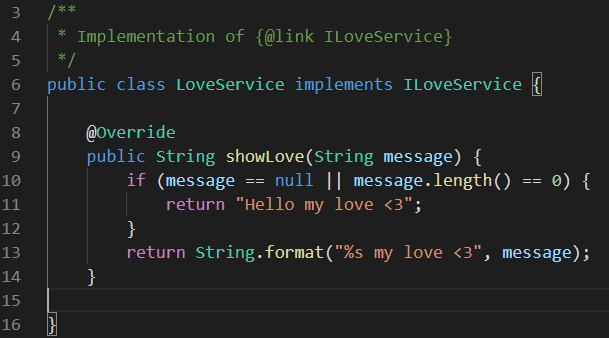
The first file is the interface for our service and the second is its implementation. Now, the API itself! Create this file:
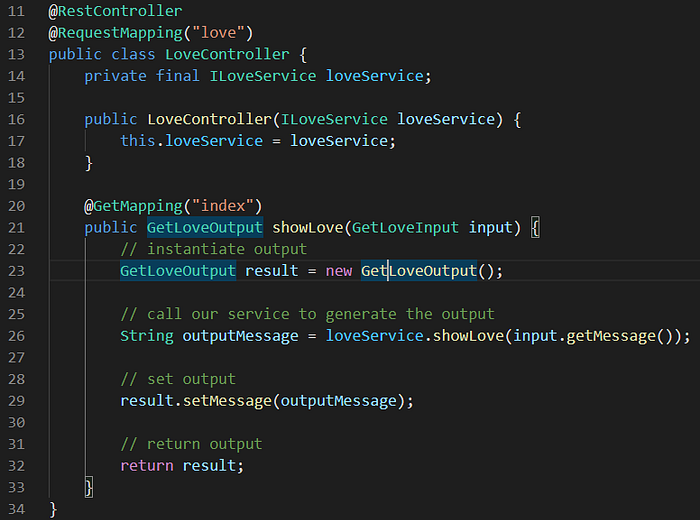
- Controller needs a “@RestController” annotation to declare itself as a controller
- Controller has a “@RequestMapping(“love”) for its routing purposes. I am not going to discuss attribute routing here, but there’s a good starter point for you.
- Our controller depends on ILoveService, so we have added it in the constructor. Later we need to inject this service and of course I am not going to discuss Dependency Inject (One of the five rules in SOLID principles).
- Later, I declared our first API. This API will appear in /love/index path as a GET method. If you checkout the input for this API, I did not use any annotation for parameter mapping, and just used our GetLoveInput class. I tend to write my APIs this way (using classes for inputs and outputs), because it gives me more flexibility if the number of parameters increase over time. For example if my API wants 10 arguments, then my API function parameters will remain like this :-)
- I think the code inside the API is simple and don’t need any description.
Now, if you run the app, (I repeat ./mvnw.cmd spring-boot:run), you’ll see this error:

It says, that our LoveController needs ILoveService but we haven’t injected this service in the Spring Boot DI container. For that, I modify the LoveBackendApplication.java file:
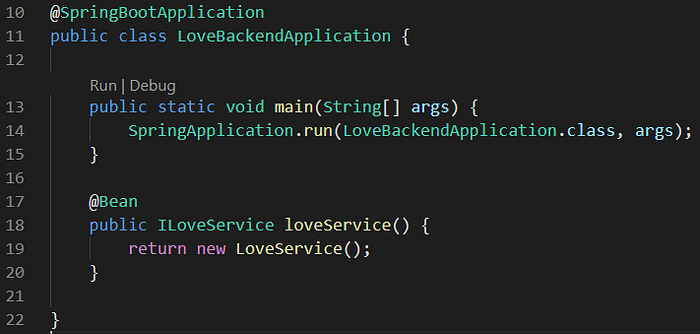
Look at the loveService method. This is one of the many ways you can inject your services inside Spring Boot. For a detailed description, look here, as it has a very good documentation on this matter.
Now run the app and open localhost:8080/love/index?message=Hello and you’ll see this:

So far, API Model Binding is good, API output is good, Dependency Injection is ok. Let’s enable live-reload.
REST API → livereload (hot-reload, live-reload, automatic restart, … whatever you name it)
Spring Boot has a plugin which when used, allows us to eliminate the
CODE → BUILD → RUN → TEST → STOP → CODE
cycle and have this cycle: (WAIT: app builds and runs automatically)
CODE → WAIT (some seconds) → TEST → CODE
Now, add this maven repository spring-boot-devtools like what we talked about previously:

Spring Boot apps have an application.properties file, which allows to keep your app-level-configuration clean. Open that file and add these two lines:
spring.devtools.restart.poll-interval=2sspring.devtools.restart.quiet-period=1s
First line, tells the devtools (the one we installed) to check file changes every 2 seconds and the second line tells it to wait for 1 second before reaching to a conclusion that the developer has actually stopped writing code.
Now run the app and call your API. Then without stopping (CTRL+C) change some Java code (for example the output of API) and save the file. Then wait for 2 or 3 seconds. Now you definitely have seen a change in your terminal. Call your API again and VOILA! your new output is there. And you didn’t have to compile the code again.
REST API → MongoDB
To make it resemble a real-world application we need to add database. Add this MongoDB dependency: spring-boot-starter-data-mongodb

For our code to use MongoDB, say we want to log every time that the /love/index API is called. So create these two files:
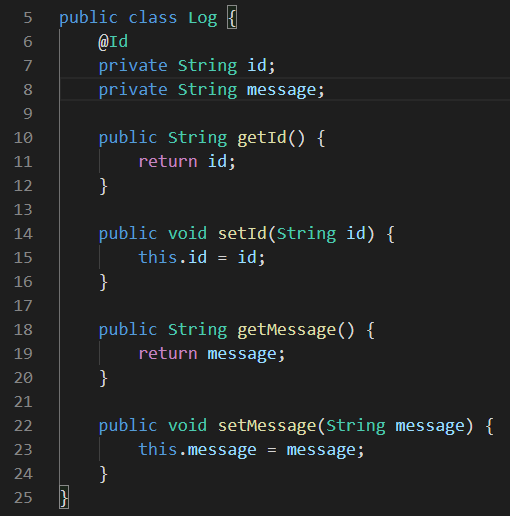

Log.java represents our document model inside MongoDB. LogRepository is an interface extending the MongoRepository. Generic arguments are Log (our model) and String (datatype of Log::Id field inside database: databases stores Id as String). A good thing is that MongoRepository implements many useful methods. Another thing is that LogRepository’s implementation is automatically injected :-)
Now, edit the LoveService.java to look like this:
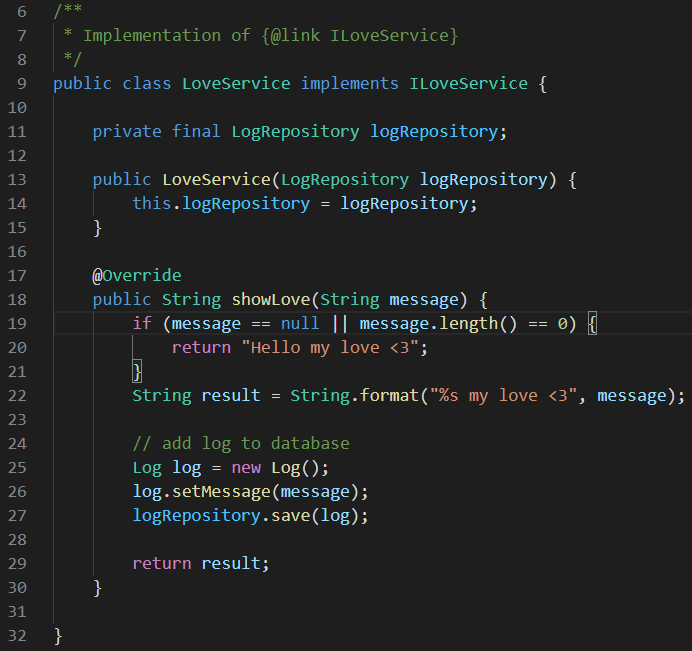
In our method we added logging capability. Next head to LoveBackendApplication.java file to update LoveService instantiation:
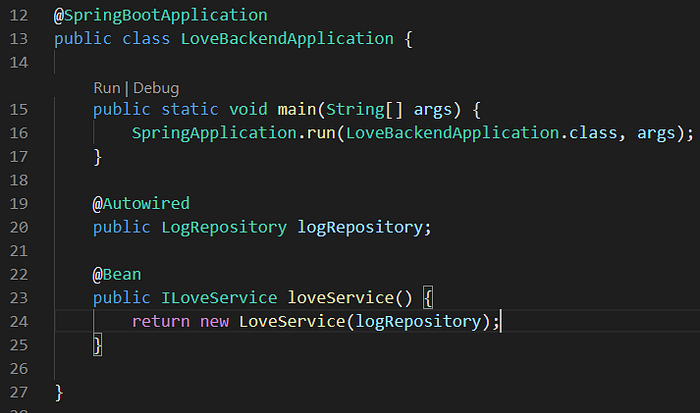
Adding Autowired annotation, tells the Spring Boot to go find an implementation for our LogRepository from spring-boot-starter-data-mongodb package. Before running the application, we must config MongoDB parameters for our application in application.properties file:
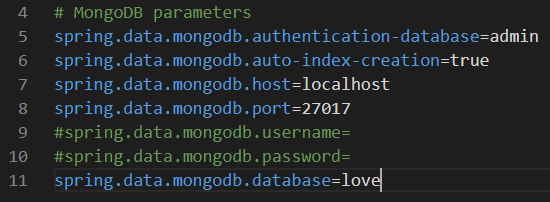
Some notes:
- authentication-database: The database to authenticate the given username & password. Look here for more information about authentication in MongoDB. In summary, MongoDB uses a database for authenticating even if the user wants to work on another database.
- auto-index-creation: This makes sure that MongoDB would create index automatically
- host & port: These are the default for MongoDB
- username & password: In my development system I don’t have any username/password. If you uncomment these two lines you’ll encounter errors while authenticating, and that’s because configuring empty values in application.properties is like this: If you don’t want a config, don’t mention it.
- database: Our database name is love. You don’t need to create the database before-hand because MongoDB will create it on the first access.
Now run the app and call the API. If you open MongoDB Compass application (I am on Windows 10), you’ll see that the logs are getting inserted:
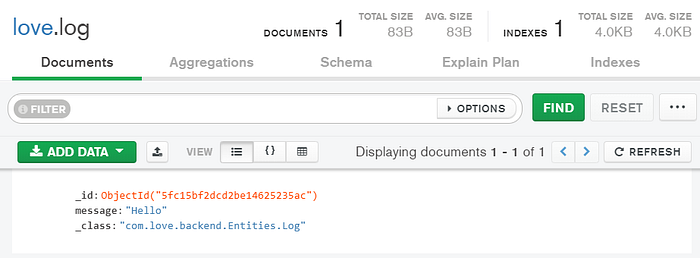
MongoDB has created the database for us and Spring Boot has created log collection. Besides, the logs are there.
Pack the app: This command will create a .jar file inside target directory.
./mvnw.cmd packageDOCKER → Hello Compose
At the root of the project directory create docker-compose.yml file. Then add this line:
version: "3.8"
services:
Then in the services section, add this:
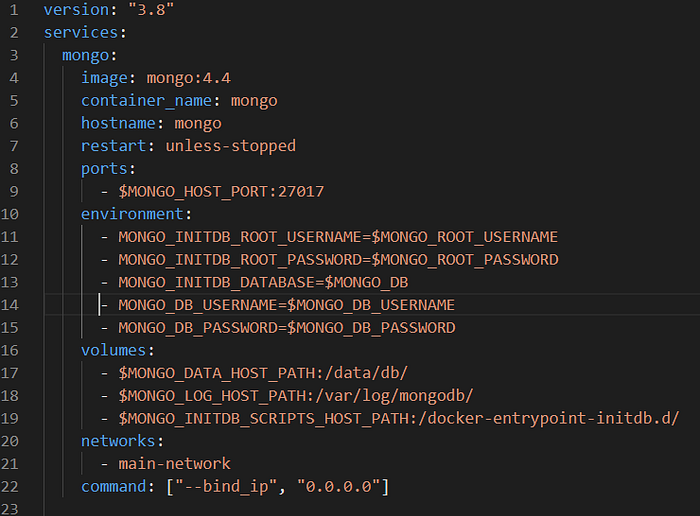
This will add MongoDB 4.4 service. Some notes:
- image: Name of the image to pull from
- container_name: Name of the final container for this service
- hostname: Tells docker that this service has the hostname equal to mongo within the network among our services.
- restart: unless-stopped means that if something bad internally happens in the container, restart it, unless some user stops the container manually
- ports: Says to bind the host port $MONGO_HOST_PORT to the port 27017 of the container. This allows outer world to access the MongoDB instance. $MONGO_HOST_PORT is an environment variable that we have defined for our docker-compose.
- environment: It has several env vars including the root username/password, application database and the username/password for the application database user.
- volumes: We will mount first the data directory of MongoDB to a directory in host (because we don’t want our data to be removed when the container restarts), then log directory and finally the directory with initial scripts when the container starts for the first time. These scripts will create the application database user.
- networks: We indicate that this service is communicating inside the “main-network”
- command: Here we tell docker to start MongoDB with “ — bind_ip 0.0.0.0” argument, because we want MongoDB to listen to requests from any IP address.
Now, add the service for our application:
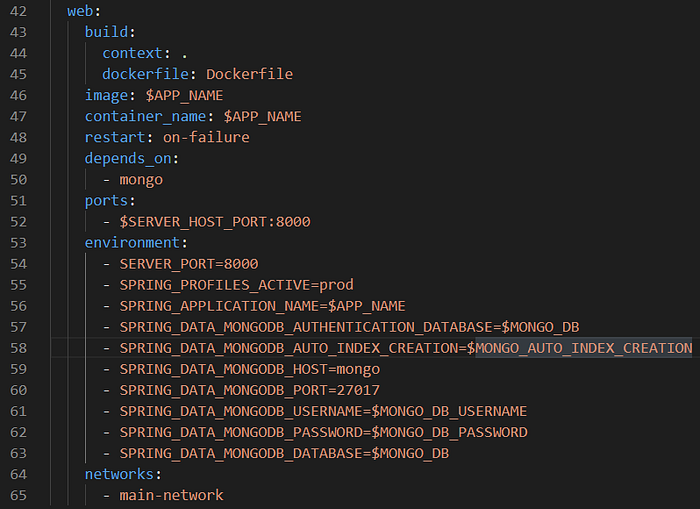
There are some important notes:
- This service needs a Dockerfile be present for building the docker image. We’ll get to it later.
- This service depends on mongo service to be started
- Configurations of our application.properties for production are given here. Note that dot(.) and hyphen(-) are replaced with underscore (_). This is how you can override values of application.properties with environment variables. And remember that in production we won’t be using application.properties because we have specified the values here:
— Server_PORT (server.port): The port to start the server inside the container
— SPRING_PROFILES_ACTIVE (spring.profiles.active): Active profile of our app which is prod (short for production)
— SPRING_APPLICATION_NAME (spring.application.name): Name of application
— SPRING_DATA_MONGODB_AUTHENTICATION_DATABASE (spring.data.mongodb.authentication-database)
— SPRING_DATA_MONGODB_AUTO_INDEX_CREATION (spring.data.mongodb.auto-index-creation)
— SPRING_DATA_MONGODB_HOST (spring.data.mongodb.host)
— SPRING_DATA_MONGODB_PORT (spring.data.mongodb.port)
— SPRING_DATA_MONGODB_USERNAME (spring.data.mongodb.username)
— SPRING_DATA_MONGODB_PASSWORD (spring.data.mongodb.password)
— SPRING_DATA_MONGODB_DATABASE (spring.data.mongodb.database)
At the end of the file add this:

This tells docker that the term “main-network” in docker-compose.yml, refers to an external docker network named $NETWORK_NAME.
Now you have this file: docker-compose.yml
As I’m trying to do things clean, As you see I used environment variables just for anything. Now, we need to define our environment variables and directories for volumes. So somewhere on your disk, create a folder named love. Mine is at A:\love. Make it look like this:
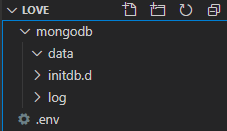
mongodb/data: Is our MongoDB data directory
mongodb/log: Is our MongoDB log directory
mongodb/initdb.d: Holds our initialization scripts for MongoDB
create a file called create-user.sh inside initdb.d with this content:
#!/bin/bashmongo -u "$MONGO_INITDB_ROOT_USERNAME" -p "$MONGO_INITDB_ROOT_PASSWORD" --authenticationDatabase "$rootAuthDatabase" "$MONGO_INITDB_DATABASE" --eval "db.createUser({ user: '$MONGO_DB_USERNAME', pwd: '$MONGO_DB_PASSWORD', roles: [{ role: 'dbOwner', db: '$MONGO_INITDB_DATABASE' }] })"
This command will be executed when the container for MongoDB starts for the first time. It will create an owner for application database using root username/password credentials.
Open .env and put these:
# host ports
SERVER_HOST_PORT=25000
MONGO_HOST_PORT=26000# host paths to mount
MONGO_DATA_HOST_PATH="A:\love\mongodb\data"
MONGO_LOG_HOST_PATH="A:\love\mongodb\log"
MONGO_INITDB_SCRIPTS_HOST_PATH="A:\love\mongodb\initdb.d"# application
APP_NAME=love
NETWORK_NAME=love-network# mongodb
MONGO_AUTO_INDEX_CREATION=true
MONGO_ROOT_USERNAME=root
MONGO_ROOT_PASSWORD=root
MONGO_DB=love
MONGO_DB_USERNAME=user1
MONGO_DB_PASSWORD=user1
These are the values for environment variables that are used inside docker-compose.yml and create-user.sh. Please remember that this file holds all your secrets, so don’t push it to your git repository :-). Keep it safe, Keep it Hidden (Gandalf).
At the root of project directory, create Dockerfile and write these: (read the comments)
FROM openjdk:11-jdk-slim# Set the server's time zone for the container
ENV TZ=Europe/Berlin
RUN ln -snf /usr/share/zoneinfo/$TZ /etc/localtime && echo $TZ > /etc/timezone# update sources
RUN apt-get update# You can install some packages
#RUN apt-get install -y curl# run under a user. This makes the whole thing more secure
RUN groupadd normalgroup
RUN useradd -G normalgroup normaluser
USER normaluser:normalgroup# run app
ARG JAR_FILE=target/*.jar
COPY ${JAR_FILE} app.jar
ENTRYPOINT ["java","-jar","/app.jar"]
Before running docker-compose, we need to create the “love-network”:
docker network create love-networkNext build the containers:
docker-compose --env-file "A:\love\.env" buildRun:
docker-compose --env-file "A:\love\.env" up -dAnd your containers are working :-). Don’t trust me? Let’s take a look.
Open localhost:25000/love/index?message=Hello in your browser, and you should see the result. To check if the logs are written in database, open MongoDB Compass and connect to our database with this:
mongodb://user1:user1@localhost:26000/love?authSource=love&readPreference=primary&appname=MongoDB%20Compass&ssl=falseAnd you should see logs getting written.
In this article, we made a simple REST API with Spring Boot and MongoDB, used docker-compose to create our containers, heavily used environment variables to set secrets (to prevent from credentials to be pushed to our git server), did not connect to MongoDB using the root user… .
My name is Saeed Farahi Mohassel and source code for this article is available here.
